780-554-7475
jonatonw@gmail.com

Standing Seam Installation Guide

Professional installation techniques for structural standing seam systems

Installation Guide

Professional Installation Required

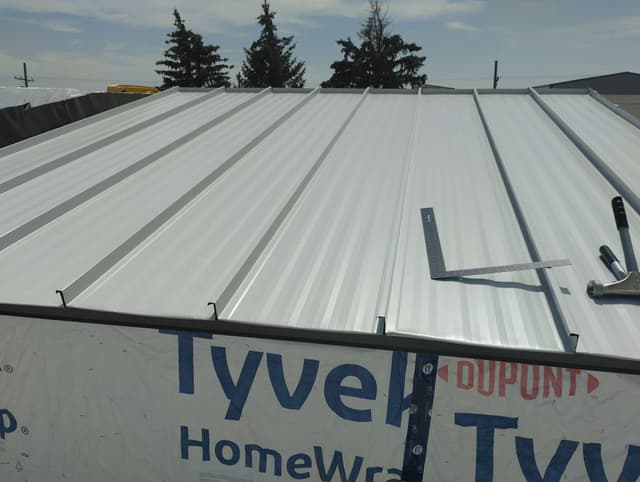
Standing seam installation requires specialized equipment and training. Improper installation will void warranty and may result in system failure. Always use certified contractors experienced with seaming machines.

Specialized Tools & Equipment

Portable Seaming Machine

Electric or pneumatic seamer for field joints

Clip Installation Tools

Drill, bits, and appropriate fasteners

Panel Handling Equipment

Suction cups, panel lifts for long panels

Measuring & Layout Tools

Chalk line, measuring tape, square

Cutting Equipment

Metal shears, cutting blades for field cuts

Safety Equipment

Fall protection, hard hats, safety glasses

Leveling Tools

4-foot level, string line for alignment

Weather Protection

Tarps and temporary covering materials

Clip System Guide

Fixed Clips

Used at panel centers for structural attachment

Application: Mid-span locations where no thermal movement expected

Sliding Clips

Allow thermal expansion and contraction

Application: Panel ends and long runs exceeding 40 feet

Snow Clips

Enhanced clips for high snow load areas

Application: Required in Alberta for snow loads exceeding design

Professional Installation Process

1

Site Preparation & Safety

Establish safe working conditions and prepare the roof structure.

Installation Details:

  • Install comprehensive fall protection systems
  • Verify roof structure meets load requirements
  • Check roof deck for proper ventilation design
  • Ensure minimum 1:12 pitch requirement is met
  • Install ice and water shield in critical areas

Safety & Quality:

  • Use OSHA-compliant safety equipment at all times
  • Monitor weather conditions - no installation in high winds
  • Establish emergency procedures and communication
2

Underlayment & Deck Preparation

Install proper underlayment and prepare deck for panel installation.

Installation Details:

  • Install high-temperature synthetic underlayment
  • Ensure proper overlap (6" minimum at seams)
  • Install eave and rake edge flashing first
  • Mark panel layout lines with chalk
  • Verify square measurements across roof

Safety & Quality:

  • Use appropriate fasteners for deck material
  • Ensure underlayment is properly secured in wind
3

Clip System Layout

Position and install the clip system for thermal movement.

Installation Details:

  • Mark clip locations 24" on center maximum
  • Install fixed clips at mid-panel locations
  • Use sliding clips near panel ends for expansion
  • Ensure clips are properly aligned and level
  • Verify clip attachment to structure is secure

Safety & Quality:

  • Use proper fasteners rated for structural loads
  • Double-check clip alignment before proceeding
4

First Panel Installation

Install starter panel with precision for proper alignment.

Installation Details:

  • Position first panel at designated starting edge
  • Ensure panel is perfectly square and straight
  • Attach panel to clips - DO NOT penetrate panel face
  • Verify proper overhang at eave and rake
  • Check panel alignment before seaming

Safety & Quality:

  • Handle panels carefully - edges are sharp
  • Use proper lifting techniques for long panels
5

Panel Seaming Process

Create weather-tight seams using proper seaming machine techniques.

Installation Details:

  • Position adjacent panel with proper overlap
  • Begin seaming at eave and work toward ridge
  • Maintain consistent seaming speed and pressure
  • Ensure complete seam engagement throughout
  • Inspect seam quality before proceeding

Safety & Quality:

  • Operate seaming machine according to manufacturer instructions
  • Wear appropriate PPE during seaming operations
6

Ridge & Penetration Details

Complete installation with proper ridge caps and penetration flashing.

Installation Details:

  • Install ridge ventilation if specified
  • Attach ridge caps with proper fastening
  • Flash all roof penetrations correctly
  • Install snow guards if required
  • Complete final inspection of all details

Safety & Quality:

  • Follow manufacturer specs for all accessories
  • Ensure all penetrations are properly sealed

Professional Installation Resources

Access technical manuals, training materials, and certification programs for professional standing seam installation.